SSM整合

  • 一、项目概览

本文将实现一个基于 SSM-VUE 前后端分离的 CRUD 的小 Demo 来学习SSM整合,项目命名为SSM-VUE-CRUD

相关技术

前端

  • 开发框架:Vue3、Axios、Element Plus
  • 脚手架:@Vue/cli
  • 依赖管理: npm
  • 开发工具:VSCode 、Chrome

后端

  • 开发框架:Spring、SpringMVC、Mybatis
  • 数据库:MySQL
  • 分页: pagehelper
  • 逆向工程: Mybatis Generator
  • 依赖管理: Maven
  • 开发工具:IDEA 2022.1、Navicat 16

项目展示

1.员工列表

img

2.添加员工

img

3.修改员工

img

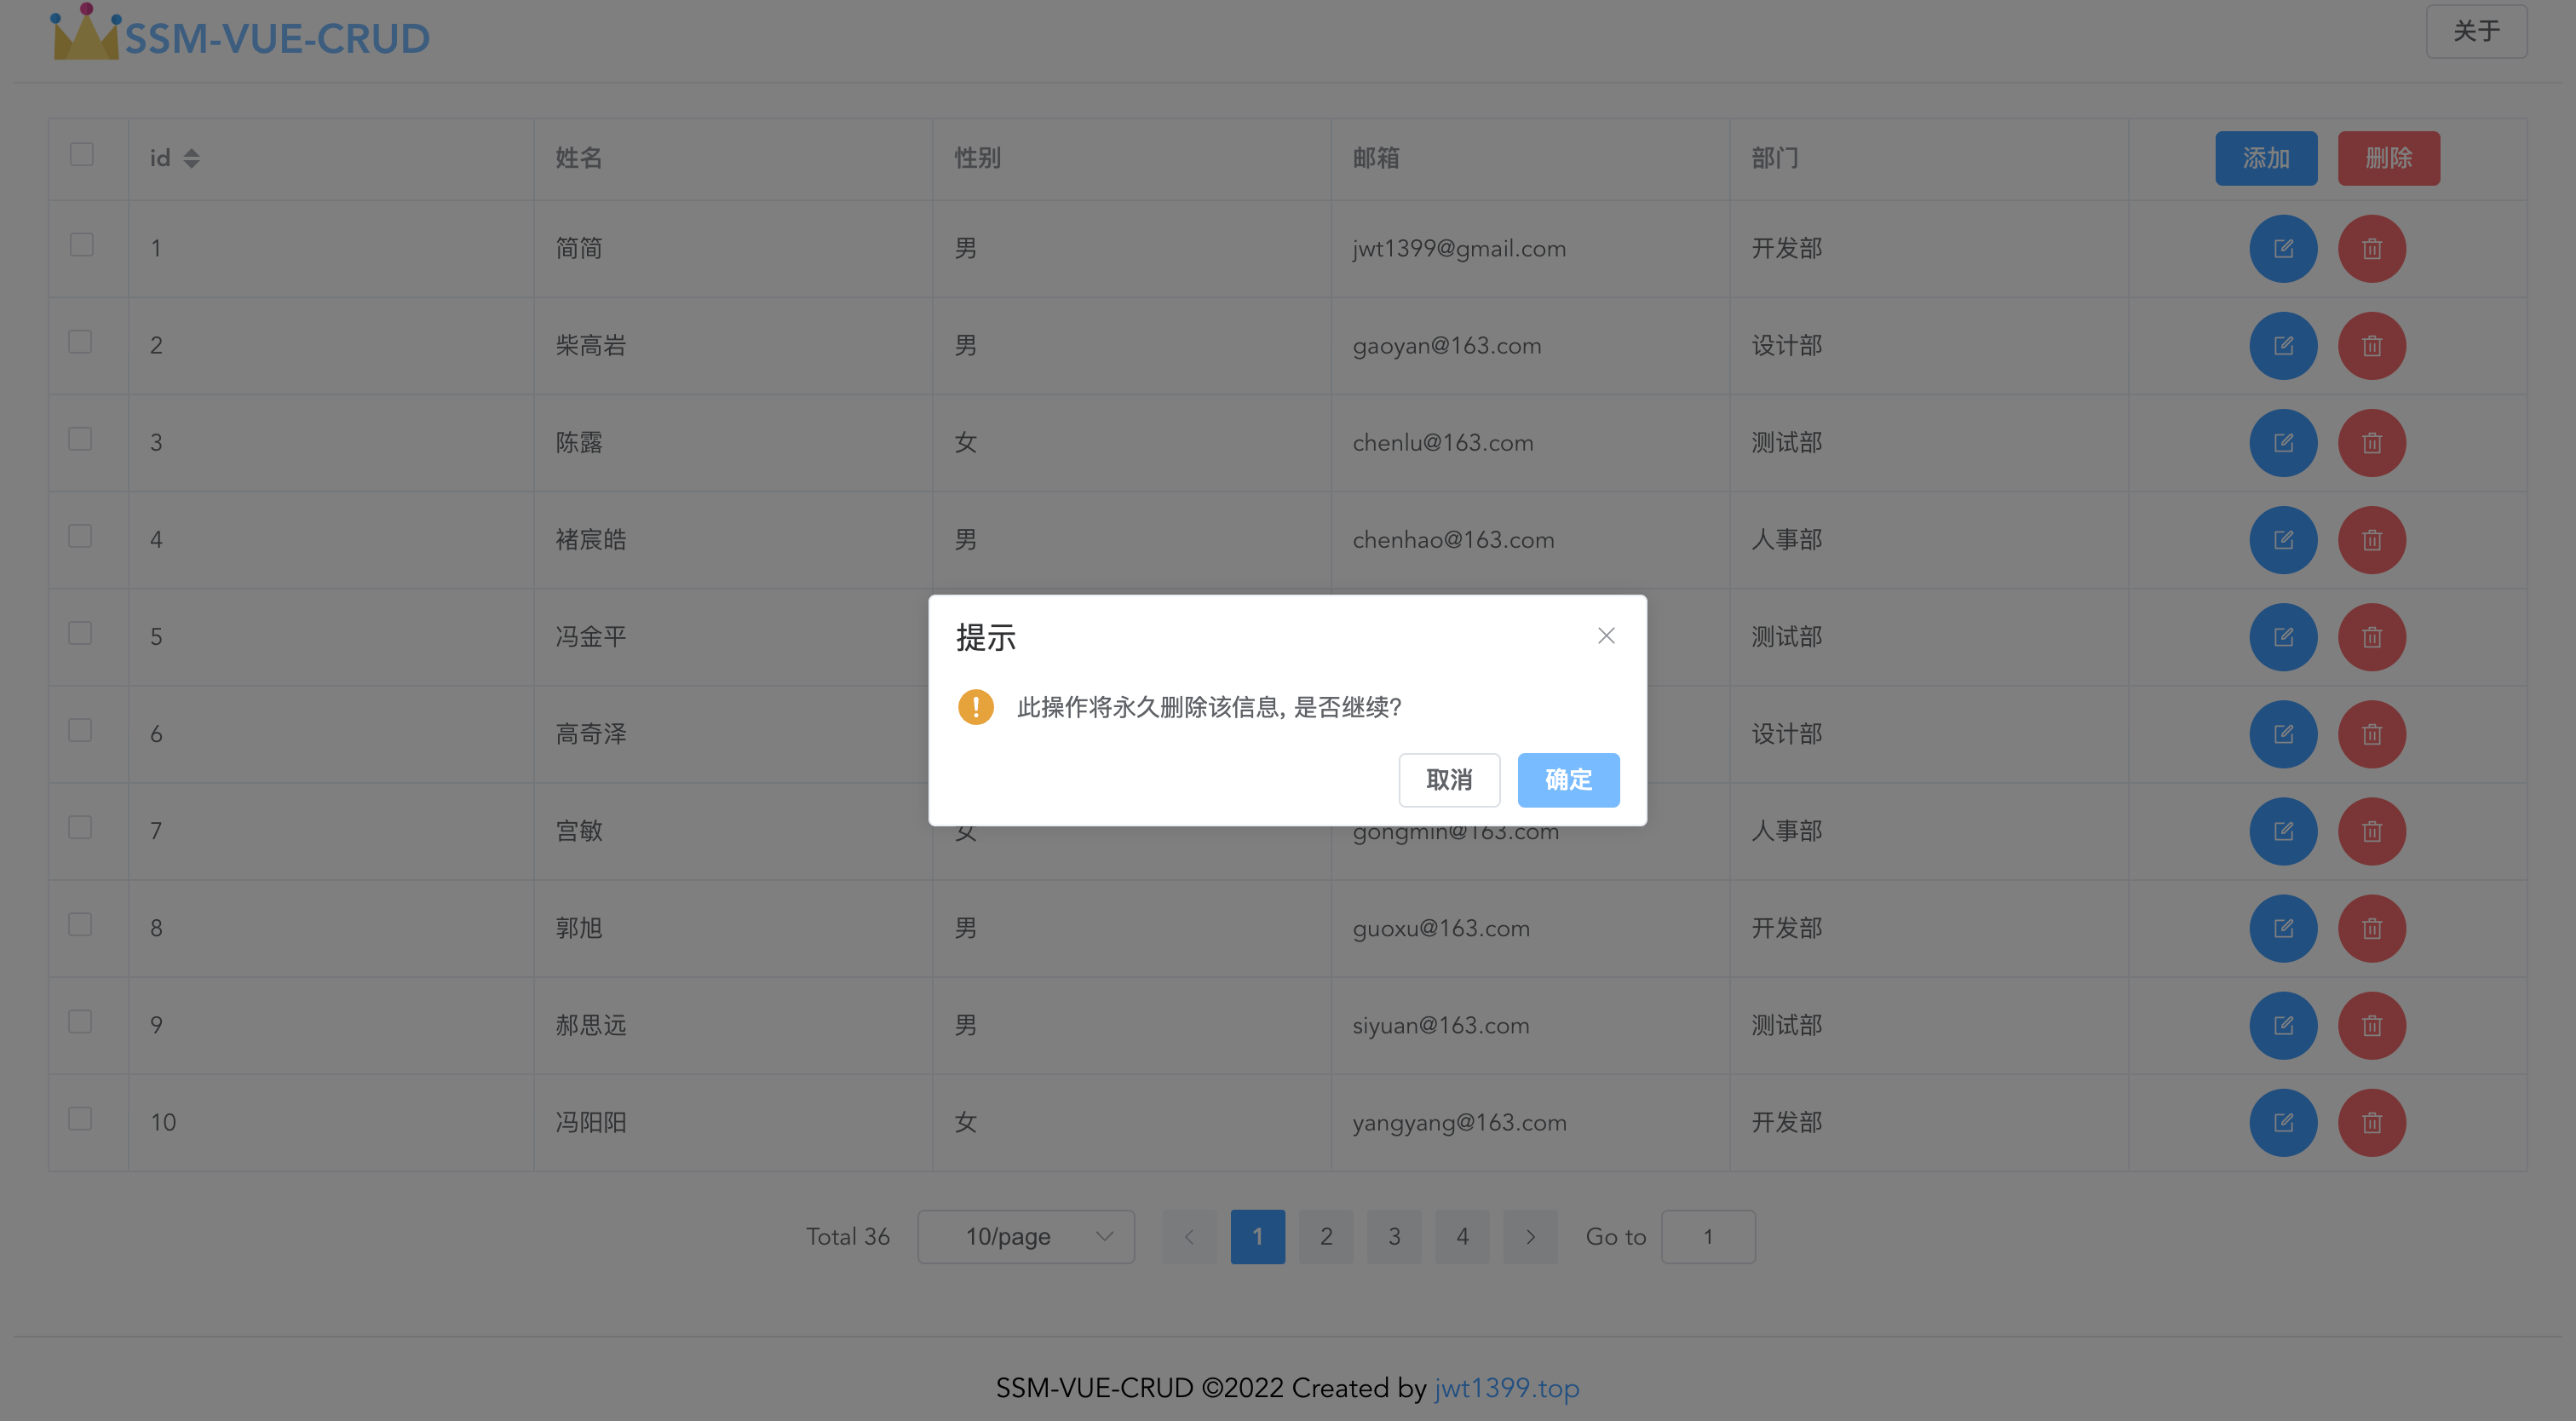
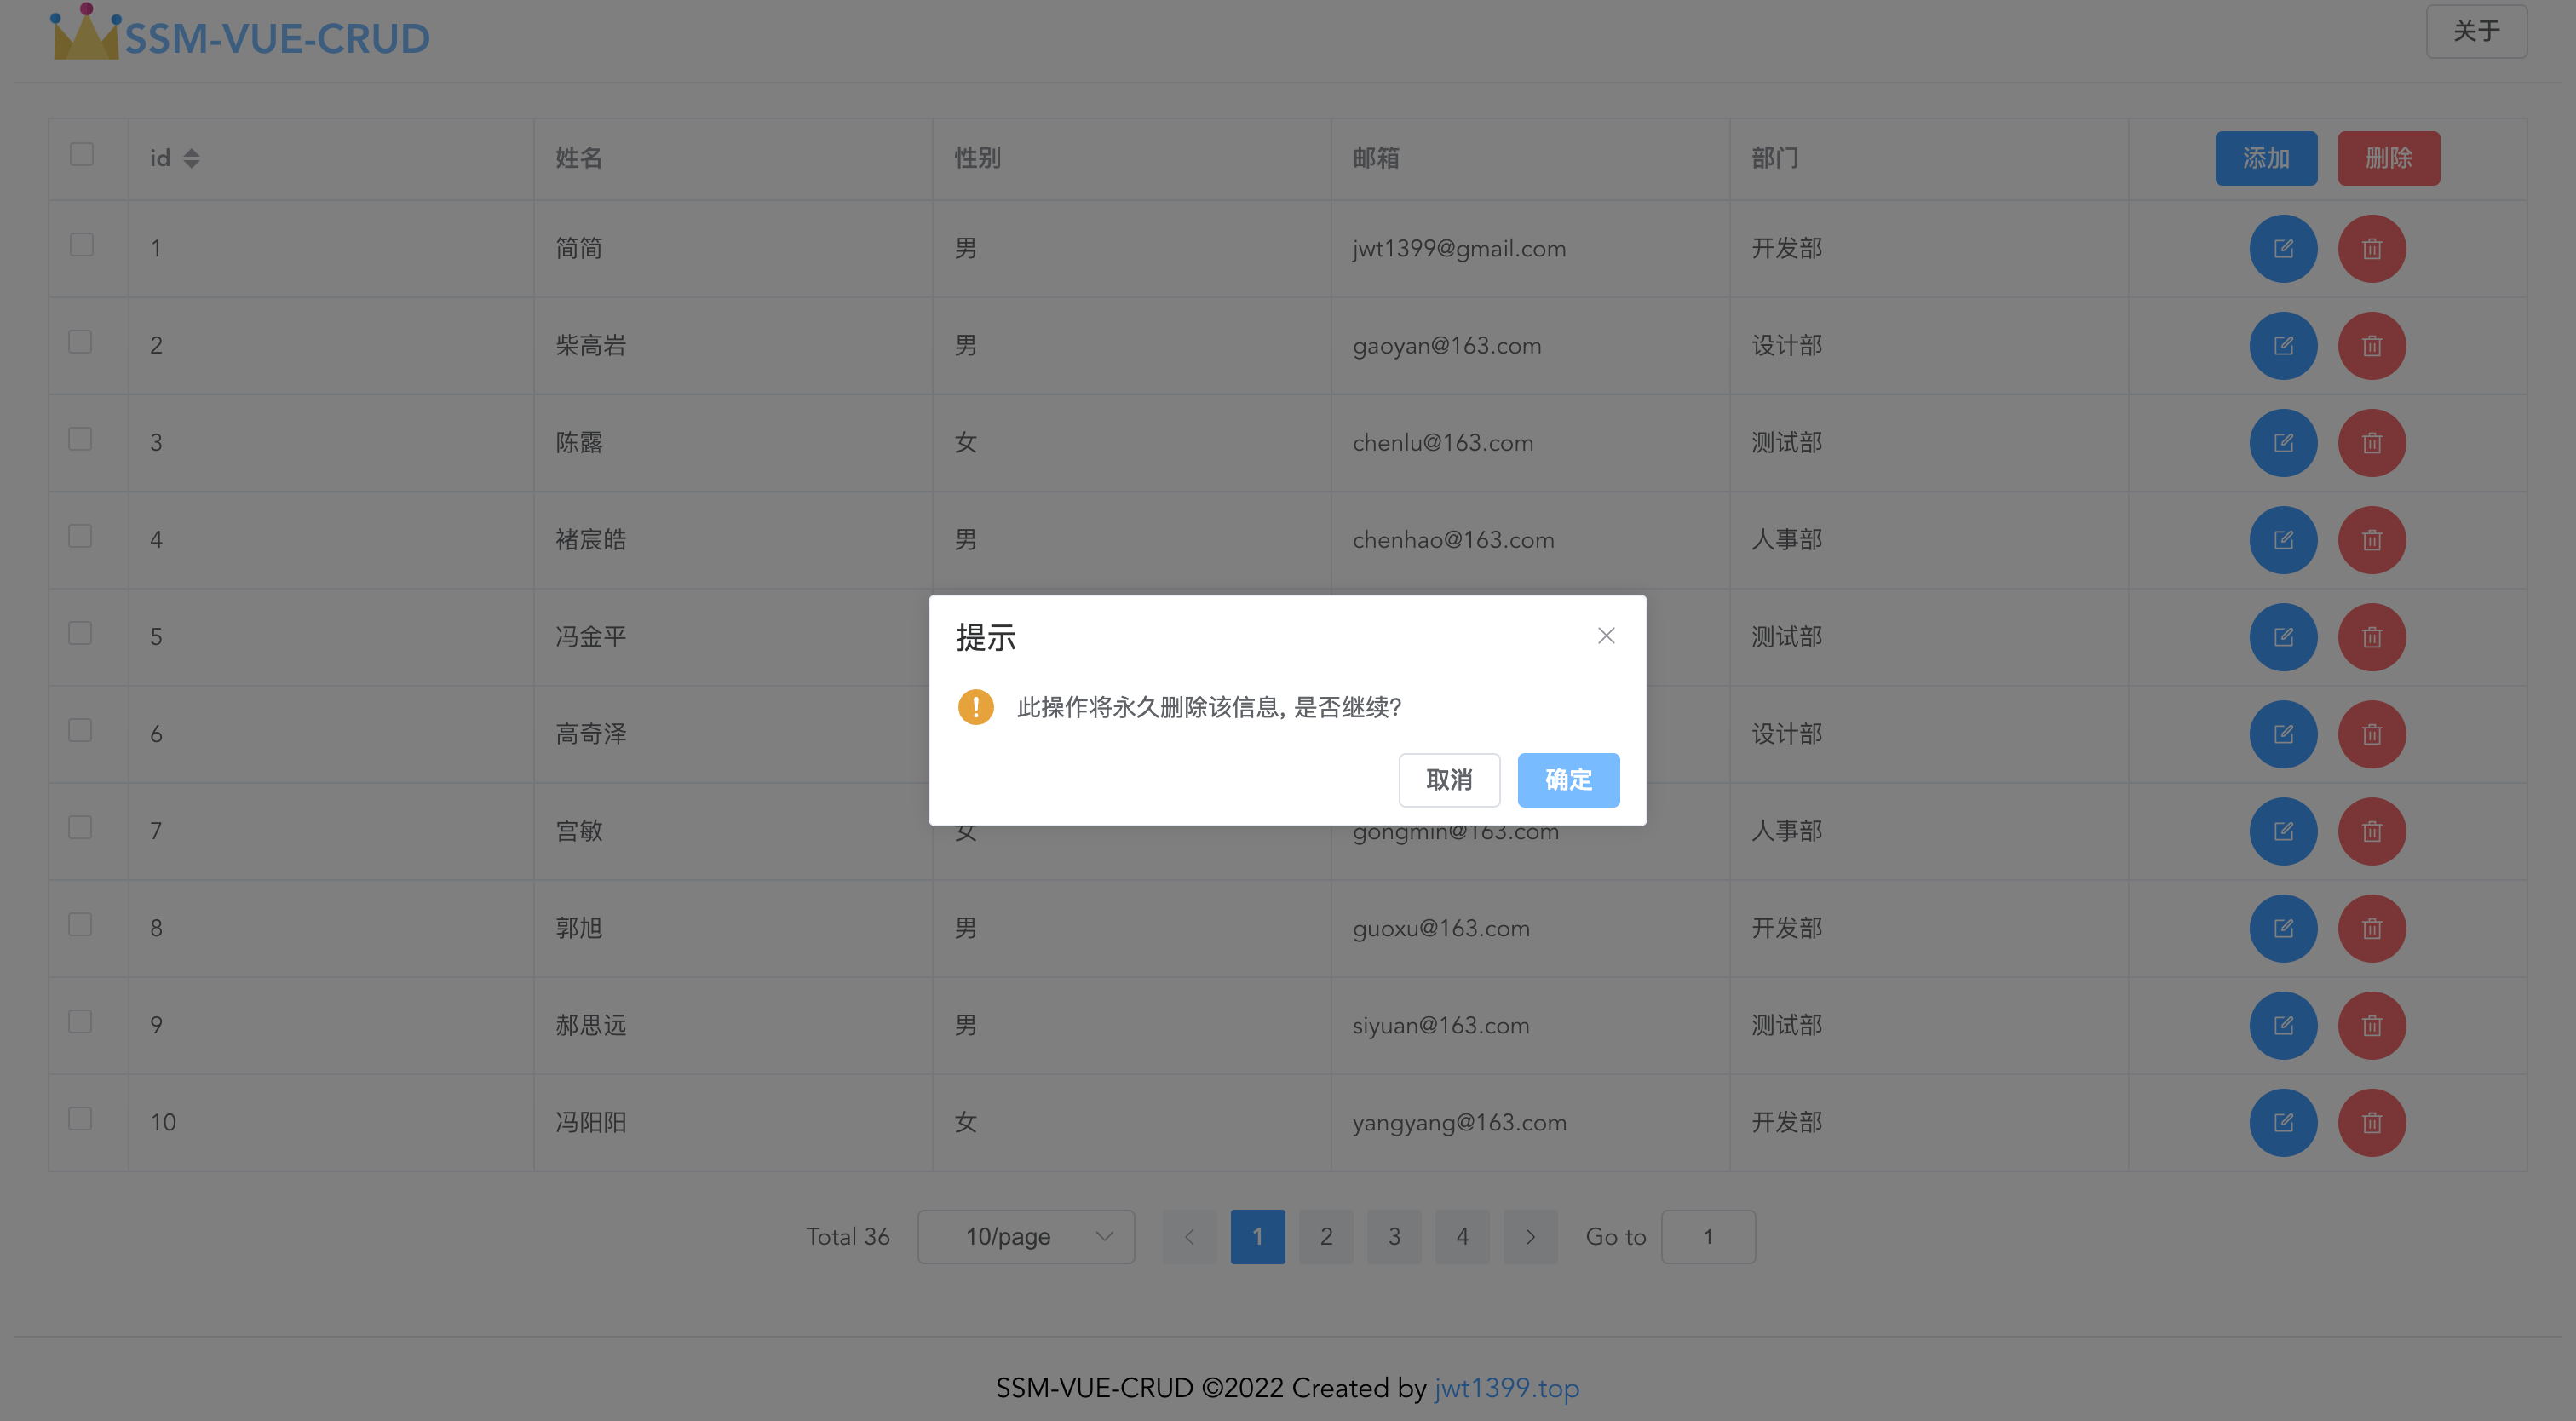
4.删除员工

img

5.批量删除员工

img

项目部署

后端部署

1.克隆本项目到本地
1
git clone https://github.com/jwt1399/SSM-VUE-CRUD.git
2.创建数据库导入数据

先创建一个名为 ssm_crud 的数据库,然后再导入表数据 ssm_crud.sql

3.安装依赖

使用 IDEA 打开项目下的 ssm-crud-back ,等待 Maven 将 pom.xml 中的依赖下载完

4.修改数据库配置

找到 src/main/resouces/db.properties 修改成你自己的数据库配置

1
2
3
4
jdbc.driver=com.mysql.cj.jdbc.Driver
jdbc.url=jdbc:mysql://localhost:3306/ssm_crud?useUnicode=true&characterEncoding=utf8
jdbc.username=root
jdbc.password=root
5.添加TomCat
  • 点击 Add Configuration(添加配置) 进行配置, 点击 + 号,找到 Tomcat Service -> Local(本地)
  • 再点击 Tomcat 配置界面的 Deployment(部署),再点击右下角的 fix ,选择 ssm-crud-back:war exploded,再将 Application context(应用程序上下文) 改为 /ssm_crud_back
  • 再将服务器 URL 改为”http://localhost:8080/ssm_crud_back/“,修改后应用即可
6.启动项目

配置完 TomCat 后运行项目,浏览器会打开”http://localhost:8080/ssm_crud_back/“,显示“SSM-VUE-CRUD后端部署成功!!!”的文字,表示后端运行成功

前端部署

1.安装依赖

使用 VScode 打开项目下的 ssm-crud-front,打开终端执行 npm i 下载依赖

2.启动项目

终端再执行 npm run serve 运行项目,编译完成后会浏览器会自动打开 “http://0.0.0.0:8084/#/“(可在vue.config.修改),当看到项目展示中的页面就说明部署成功啦。

二、后端实现

1.环境搭建

a.创建Maven项目

参考:IDEA创建maven web工程

b.引入项目依赖jar包

需要配置Spring,SpringMVC,mybatis,数据库连接池,数据库驱动包,以及其他的jar包,比如junit等。

1
2
3
4
5
6
7
8
9
10
11
12
13
14
15
16
17
18
19
20
21
22
23
24
25
26
27
28
29
30
31
32
33
34
35
36
37
38
39
40
41
42
43
44
45
46
47
48
49
50
51
52
53
54
55
56
57
58
59
60
61
62
63
64
65
66
67
68
69
70
71
72
73
74
75
76
77
78
79
80
<dependencies>
<!-- Spring WebMVC -->
<dependency>
<groupId>org.springframework</groupId>
<artifactId>spring-webmvc</artifactId>
<version>5.3.20</version>
</dependency>

<!-- Spring JDBC -->
<dependency>
<groupId>org.springframework</groupId>
<artifactId>spring-jdbc</artifactId>
<version>5.3.20</version>
</dependency>

<!-- Spring Aspects -->
<dependency>
<groupId>org.springframework</groupId>
<artifactId>spring-aspects</artifactId>
<version>5.3.20</version>
</dependency>

<!-- Spring test -->
<dependency>
<groupId>org.springframework</groupId>
<artifactId>spring-test</artifactId>
<version>5.3.20</version>
<scope>test</scope>
</dependency>

<!-- Mybatis -->
<dependency>
<groupId>org.mybatis</groupId>
<artifactId>mybatis</artifactId>
<version>3.5.10</version>
</dependency>

<!-- spring 与 mybatis 的整合包 -->
<dependency>
<groupId>org.mybatis</groupId>
<artifactId>mybatis-spring</artifactId>
<version>2.0.7</version>
</dependency>

<!-- 数据库连接池,druid -->
<dependency>
<groupId>com.alibaba</groupId>
<artifactId>druid</artifactId>
<version>1.2.10</version>
</dependency>

<!-- mysql驱动包 -->
<dependency>
<groupId>mysql</groupId>
<artifactId>mysql-connector-java</artifactId>
<version>8.0.29</version>
</dependency>

<!-- 逆向工程 -->
<dependency>
<groupId>org.mybatis.generator</groupId>
<artifactId>mybatis-generator-core</artifactId>
<version>1.4.1</version>
</dependency>

<!-- pagehelper 分页插件 -->
<dependency>
<groupId>com.github.pagehelper</groupId>
<artifactId>pagehelper</artifactId>
<version>5.3.0</version>
</dependency>

<!-- jackson-databind -->
<dependency>
<groupId>com.fasterxml.jackson.core</groupId>
<artifactId>jackson-databind</artifactId>
<version>2.13.3</version>
</dependency>

</dependencies>

c.配置web.xml

1
2
3
4
5
6
7
8
9
10
11
12
13
14
15
16
17
18
19
20
21
22
23
24
25
26
27
28
29
30
31
32
33
34
35
36
37
38
39
40
41
42
43
44
45
46
47
48
49
50
51
52
53
54
55
56
57
58
59
60
61
62
63
64
65
66
67
68
69
70
71
<?xml version="1.0" encoding="UTF-8"?>
<web-app xmlns="http://xmlns.jcp.org/xml/ns/javaee"
xmlns:xsi="http://www.w3.org/2001/XMLSchema-instance"
xsi:schemaLocation="http://xmlns.jcp.org/xml/ns/javaee http://xmlns.jcp.org/xml/ns/javaee/web-app_4_0.xsd"
version="4.0">
<!-- step1: 配置全局的参数,启动Spring容器 -->
<context-param>
<param-name>contextConfigLocation</param-name>
<!-- 若没有提供值,默认会去找/WEB-INF/applicationContext.xml。 -->
<param-value>classpath:applicationContext.xml</param-value>
</context-param>
<listener>
<listener-class>org.springframework.web.context.ContextLoaderListener</listener-class>
</listener>

<!-- step2: 配置SpringMVC的前端控制器,用于拦截所有的请求 -->
<servlet>
<servlet-name>springMVC</servlet-name>
<servlet-class>org.springframework.web.servlet.DispatcherServlet</servlet-class>

<init-param>
<param-name>contextConfigLocation</param-name>
<!-- 若没有提供值,默认会去找WEB-INF/*-servlet.xml。 -->
<!-- 使用classpath:表示从类路径查找配置文件,例如maven工程中的src/main/resources -->
<param-value>classpath:springMVC.xml</param-value>
</init-param>
<!-- 启动优先级,数值越小优先级越大 -->
<load-on-startup>1</load-on-startup>
</servlet>
<servlet-mapping>
<servlet-name>springMVC</servlet-name>
<!-- 将DispatcherServlet请求映射配置为"/",则Spring MVC将捕获Web容器所有的请求,包括静态资源的请求 -->
<url-pattern>/</url-pattern>
</servlet-mapping>

<!-- step3: characterEncodingFilter字符编码过滤器,放在所有过滤器的前面 -->
<filter>
<filter-name>characterEncodingFilter</filter-name>
<filter-class>org.springframework.web.filter.CharacterEncodingFilter</filter-class>
<init-param>
<!--要使用的字符集,一般我们使用UTF-8(保险起见UTF-8最好)-->
<param-name>encoding</param-name>
<param-value>UTF-8</param-value>
</init-param>
<init-param>
<!--是否强制设置request的编码为encoding,默认false,不建议更改-->
<param-name>forceRequestEncoding</param-name>
<param-value>false</param-value>
</init-param>
<init-param>
<!--是否强制设置response的编码为encoding,建议设置为true-->
<param-name>forceResponseEncoding</param-name>
<param-value>true</param-value>
</init-param>
</filter>
<filter-mapping>
<filter-name>characterEncodingFilter</filter-name>
<!--这里不能留空或者直接写 ' / ' ,否则可能不起作用-->
<url-pattern>/*</url-pattern>
</filter-mapping>

<!-- step4: 配置过滤器,将post请求转为delete,put -->
<filter>
<filter-name>HiddenHttpMethodFilter</filter-name>
<filter-class>org.springframework.web.filter.HiddenHttpMethodFilter</filter-class>
</filter>
<filter-mapping>
<filter-name>HiddenHttpMethodFilter</filter-name>
<url-pattern>/*</url-pattern>
</filter-mapping>
</web-app>

d.配置springMVC.xml

Spring MVC 的配置文件,主要包含网站跳转逻辑的控制、配置。

1
2
3
4
5
6
7
8
9
10
11
12
13
14
15
16
17
18
19
20
21
22
23
<?xml version="1.0" encoding="UTF-8"?>
<beans xmlns="http://www.springframework.org/schema/beans"
xmlns:xsi="http://www.w3.org/2001/XMLSchema-instance"
xmlns:context="http://www.springframework.org/schema/context"
xmlns:mvc="http://www.springframework.org/schema/mvc"
xsi:schemaLocation="http://www.springframework.org/schema/beans http://www.springframework.org/schema/beans/spring-beans.xsd http://www.springframework.org/schema/context https://www.springframework.org/schema/context/spring-context.xsd http://www.springframework.org/schema/mvc https://www.springframework.org/schema/mvc/spring-mvc.xsd">

<!-- step1: 配置Controller扫描方式 -->
<!-- 使用组件扫描的方式可以一次扫描多个Controller,只需指定包路径即可 -->
<context:component-scan base-package="com.jianjian.crud" use-default-filters="false">
<!-- 一般在SpringMVC的配置里,只扫描Controller层,Spring配置中扫描所有包,但是排除Controller层。
context:include-filter要注意,如果base-package扫描的不是最终包,那么其他包还是会扫描、加载,如果在SpringMVC的配置中这么做,会导致Spring不能处理事务,
所以此时需要在<context:component-scan>标签上,增加use-default-filters="false",就是真的只扫描context:include-filter包括的内容-->
<context:include-filter type="annotation" expression="org.springframework.stereotype.Controller" />
</context:component-scan>

<!-- step2: 标准配置 -->
<!-- 将 Spring MVC 不能处理的请求交给 tomcat 处理 -->
<mvc:default-servlet-handler/>
<!-- 简化注解配置,并提供更高级的功能 -->
<!--能支持 Spring MVC 更高级的一些功能,比如 JSR 303 校验、快捷的 Ajax 映射动态请求等-->
<mvc:annotation-driven />
</beans>

e.配置applicationContext.xml

Spring 的配置文件,主要配置业务逻辑相关的内容:数据源、与MyBatis的整合、事务控制等。

先创建一个 db.properties,用来保存数据库驱动的配置信息

1
2
3
4
jdbc.driver=com.mysql.cj.jdbc.Driver
jdbc.url=jdbc:mysql://localhost:3306/ssm_crud?useUnicode=true&characterEncoding=utf8
jdbc.username=root
jdbc.password=root

applicationContext.xml

1
2
3
4
5
6
7
8
9
10
11
12
13
14
15
16
17
18
19
20
21
22
23
24
25
26
27
28
29
30
31
32
33
34
35
36
37
38
39
40
41
42
43
44
45
46
47
48
49
50
51
52
53
54
55
56
57
58
59
60
61
62
63
64
65
66
67
68
69
70
71
72
<?xml version="1.0" encoding="UTF-8"?>
<beans xmlns="http://www.springframework.org/schema/beans"
xmlns:xsi="http://www.w3.org/2001/XMLSchema-instance"
xmlns:context="http://www.springframework.org/schema/context" xmlns:tx="http://www.springframework.org/schema/tx"
xmlns:aop="http://www.springframework.org/schema/aop"
xsi:schemaLocation="http://www.springframework.org/schema/beans http://www.springframework.org/schema/beans/spring-beans.xsd http://www.springframework.org/schema/context https://www.springframework.org/schema/context/spring-context.xsd http://www.springframework.org/schema/tx http://www.springframework.org/schema/tx/spring-tx.xsd http://www.springframework.org/schema/aop https://www.springframework.org/schema/aop/spring-aop.xsd">

<!-- step1: 配置包扫描方式。扫描所有包,但是排除Controller层 -->
<context:component-scan base-package="com.jianjian.crud">
<context:exclude-filter type="annotation" expression="org.springframework.stereotype.Controller"/>
</context:component-scan>

<!-- step2: 配置数据库连接信息 -->
<!-- 引入properties文件 -->
<context:property-placeholder location="classpath:db.properties"/>
<!--数据源的配置-->
<bean id="pooledDataSource" class="com.alibaba.druid.pool.DruidDataSource">
<property name="driverClassName" value="${jdbc.driver}"/>
<property name="url" value="${jdbc.url}"/>
<property name="username" value="${jdbc.username}"/>
<property name="password" value="${jdbc.password}"/>
</bean>

<!-- step3: spring 与 mybatis 整合 -->
<!-- 配置sqlSessionFactory,需要引入 mybatis-spring 包 -->
<bean id="sqlSessionFactory" class="org.mybatis.spring.SqlSessionFactoryBean">
<!-- 加载Mybatis全局配置文件 -->
<property name="configLocation" value="classpath:mybatis-config.xml"/>
<!-- 数据库连接池 -->
<property name="dataSource" ref="pooledDataSource"/>
<!-- 配置mapper文件位置,扫描映射文件 -->
<property name="mapperLocations" value="classpath:mappers/*.xml"/>
</bean>

<!-- step4: 配置批量执行的sqlSession(可选操作) -->
<bean id="sqlSession" class="org.mybatis.spring.SqlSessionTemplate">
<constructor-arg name="sqlSessionFactory" ref="sqlSessionFactory"/>
<constructor-arg name="executorType" value="BATCH"/>
</bean>

<!-- step5: 配置mapper扫描器,将 MyBatis 接口的实现加入到 IOC 容器中 -->
<bean class="org.mybatis.spring.mapper.MapperScannerConfigurer">
<!--扫描所有的 DAO 接口的实现,加入到 IOC 容器中-->
<property name="basePackage" value="com.jianjian.crud.dao"></property>
<property name="sqlSessionFactoryBeanName" value="sqlSessionFactory"/>
</bean>

<!-- step6: 配置事务控制 -->
<bean id="transactionManager" class="org.springframework.jdbc.datasource.DataSourceTransactionManager">
<!-- 配置数据源 -->
<property name="dataSource" ref="pooledDataSource"/>
</bean>

<!-- 配置aop -->
<aop:config>
<!-- 切入点表达式 -->
<!-- 第一个*表示返回任意类型,第二个*表示任意方法,..service下任意子包,(..)表示任意数量和类型的参数-->
<aop:pointcut id="txPoint" expression="execution(* com.jianjian.crud.service..*(..))"/>
<!-- 配置事务增强,指定切点表达式-->
<aop:advisor advice-ref="txAdvice" pointcut-ref="txPoint"/>
</aop:config>

<!-- 配置事务增强,事务如何增强-->
<tx:advice id="txAdvice" transaction-manager="transactionManager">
<tx:attributes>
<!-- * 代表所有方法都是事务方法-->
<tx:method name="*"/>
<!-- get* 代表以get开始的所有方法-->
<tx:method name="get*" read-only="true"/>
</tx:attributes>
</tx:advice>
</beans>

f.配置mybatis-config.xml

1
2
3
4
5
6
7
8
9
10
11
12
13
14
15
16
17
18
19
20
21
22
23
24
25
<?xml version="1.0" encoding="UTF-8" ?>
<!DOCTYPE configuration
PUBLIC "-//mybatis.org//DTD Config 3.0//EN"
"http://mybatis.org/dtd/mybatis-3-config.dtd">
<configuration>

<settings>
<!--将表中字段的下划线自动转换为驼峰-->
<setting name="mapUnderscoreToCamelCase" value="true"/>
<!--开启延迟加载-->
<setting name="lazyLoadingEnabled" value="true"/>
</settings>
<!--设置别名-->
<typeAliases>
<package name="com.jianjian.crud.bean"/>
</typeAliases>
<!-- 使用分页插件 -->
<plugins>
<plugin interceptor="com.github.pagehelper.PageInterceptor">
<!--分页参数合理化 -->
<property name="reasonable" value="true"/>
</plugin>
</plugins>

</configuration>

g.创建数据库表

先创建名为 ssm_crud 的数据库,再创建员工表 tb_emp 和部门表 tb_dept

1
2
3
4
5
6
7
8
9
10
11
12
13
14
15
16
17
18
19
20
21
22
23
24
25
26
27
28
29
30
31
32
33
34
35
36
37
38
39
SET NAMES utf8mb4;
SET FOREIGN_KEY_CHECKS = 0;

-- ----------------------------
-- Table structure for tb_dept
-- ----------------------------
DROP TABLE IF EXISTS `tb_dept`;
CREATE TABLE `tb_dept` (
`dept_id` int(11) NOT NULL AUTO_INCREMENT COMMENT '部门编号',
`dept_name` varchar(100) NOT NULL COMMENT '部门名称',
PRIMARY KEY (`dept_id`) USING BTREE,
UNIQUE KEY `uq_dept_name` (`dept_name`) USING BTREE
) ENGINE=InnoDB AUTO_INCREMENT=7 DEFAULT CHARSET=utf8 ROW_FORMAT=DYNAMIC;

-- ----------------------------
-- Records of tb_dept
-- ----------------------------
BEGIN;
INSERT INTO `tb_dept` (`dept_id`, `dept_name`) VALUES (4, '人事部');
INSERT INTO `tb_dept` (`dept_id`, `dept_name`) VALUES (1, '开发部');
INSERT INTO `tb_dept` (`dept_id`, `dept_name`) VALUES (2, '测试部');
INSERT INTO `tb_dept` (`dept_id`, `dept_name`) VALUES (3, '设计部');
COMMIT;

-- ----------------------------
-- Table structure for tb_emp
-- ----------------------------
DROP TABLE IF EXISTS `tb_emp`;
CREATE TABLE `tb_emp` (
`emp_id` int(11) NOT NULL AUTO_INCREMENT COMMENT '员工编号',
`emp_name` varchar(15) NOT NULL COMMENT '员工姓名',
`gender` int(4) DEFAULT NULL COMMENT '员工性别, 1男2女',
`email` varchar(255) DEFAULT NULL COMMENT '员工邮箱',
`d_id` int(11) DEFAULT NULL COMMENT '部门编号',
PRIMARY KEY (`emp_id`) USING BTREE,
KEY `fk_emp_dept` (`d_id`) USING BTREE,
KEY `uq_emp_name` (`emp_name`) USING BTREE,
CONSTRAINT `fk_emp_dept` FOREIGN KEY (`d_id`) REFERENCES `tb_dept` (`dept_id`)
) ENGINE=InnoDB AUTO_INCREMENT=68 DEFAULT CHARSET=utf8 ROW_FORMAT=DYNAMIC;

2.逆向工程

a.配置文件

src/main/resources/mbg.xml

1
2
3
4
5
6
7
8
9
10
11
12
13
14
15
16
17
18
19
20
21
22
23
24
25
26
27
28
29
30
31
32
33
34
35
36
37
38
39
40
41
42
43
44
45
46
47
48
<?xml version="1.0" encoding="UTF-8"?>
<!DOCTYPE generatorConfiguration
PUBLIC "-//mybatis.org//DTD MyBatis Generator Configuration 1.0//EN"
"http://mybatis.org/dtd/mybatis-generator-config_1_0.dtd">
<generatorConfiguration>
<context id="DB2Tables" targetRuntime="MyBatis3">
<!-- 清除注释信息 -->
<commentGenerator>
<property name="suppressAllComments" value="true" />
</commentGenerator>

<!-- step1: 配置数据库连接信息 -->
<jdbcConnection driverClass="com.mysql.cj.jdbc.Driver"
connectionURL="jdbc:mysql://localhost:3306/ssm_crud"
userId="root"
password="root">
</jdbcConnection>

<javaTypeResolver>
<property name="forceBigDecimals" value="false"/>
</javaTypeResolver>


<!-- step2: javaBean的生成策略-->
<javaModelGenerator targetPackage="com.jianjian.crud.bean"
targetProject="./src/main/java">
<property name="enableSubPackages" value="true" />
<property name="trimStrings" value="true" />
</javaModelGenerator>

<!-- step3:SQL映射文件的生成策略 -->
<sqlMapGenerator targetPackage="mapper"
targetProject="./src/main/resources">
<property name="enableSubPackages" value="true" />
</sqlMapGenerator>

<!-- step4: Mapper接口的生成策略 -->
<javaClientGenerator type="XMLMAPPER"
targetPackage="com.jianjian.crud.mapper"
targetProject="./src/main/java">
<property name="enableSubPackages" value="true" />
</javaClientGenerator>

<!-- step5: 指定表的生成策略 -->
<table tableName="tb_emp" domainObjectName="Employee"/>
<table tableName="tb_dept" domainObjectName="Department"/>
</context>
</generatorConfiguration>

b.生成逆向文件

1
2
3
4
5
6
7
8
9
10
11
12
public class MBGTest {
public static void main(String[] args) throws Exception {
List<String> warnings = new ArrayList<>();
boolean overwrite = true;
File configFile = new File("src/main/resources/mbg.xml");
ConfigurationParser cp = new ConfigurationParser(warnings);
Configuration config = cp.parseConfiguration(configFile);
DefaultShellCallback callback = new DefaultShellCallback(overwrite);
MyBatisGenerator myBatisGenerator = new MyBatisGenerator(config, callback, warnings);
myBatisGenerator.generate(null);
}
}

c.修改逆向文件

修改 Employee 类,添加部门属性和构造方法

1
2
3
4
5
6
7
8
9
10
11
12
//希望查询员工的同时,也查询部门信息
private Department department;
//为了给表插入数据,需要提供一个不带部门的构造器
public Employee(Integer empId, String empName, Integer gender, String email, Integer dId) {
this.empId = empId;
this.empName = empName;
this.gender = gender;
this.email = email;
this.dId = dId;
}
public Employee() {
}

修改 Department 类,添加构造方法

1
2
3
4
5
6
public class Department {
private Integer deptId;
private String deptName;
}
public Department() {
}

修改 EmployeeMapper 接口

1
2
3
4
5
6
7
8
9
public interface EmployeeMapper {
......

List<Employee> selectByExampleWithDept(EmployeeExample example);

Employee selectByPrimaryKeyWithDept(Integer empId);

......
}

修改 EmployeeMapper.xml

1
2
3
4
5
6
7
8
9
10
11
12
13
14
15
16
17
18
19
20
21
22
23
24
25
26
27
28
29
30
31
32
33
34
35
36
37
38
39
<!--新增的带有部门信息的返回结果集-->
<resultMap id="WithDeptResultMap" type="com.jianjian.crud.bean.Employee">
<id column="emp_id" jdbcType="INTEGER" property="empId" />
<result column="emp_name" jdbcType="VARCHAR" property="empName" />
<result column="gender" jdbcType="INTEGER" property="gender" />
<result column="email" jdbcType="VARCHAR" property="email" />
<result column="d_id" jdbcType="INTEGER" property="dId" />
<association property="department" javaType="com.jianjian.crud.bean.Department">
<id column="dept_id" property="deptId"/>
<result column="dept_name" property="deptName"/>
</association>
</resultMap>

<!--带部门列的sql-->
<sql id="WithDept_Column_List">
e.emp_id, e.emp_name, e.gender, e.email, e.d_id, d.dept_id, d.dept_name
</sql>

<!--新增的带部门查询-->
<select id="selectByExampleWithDept" parameterType="com.jianjian.crud.bean.EmployeeExample" resultMap="WithDeptResultMap">
select
<if test="distinct">
distinct
</if>
<include refid="WithDept_Column_List" />
from tb_emp e left join tb_dept d on e.d_id=d.dept_id
<if test="_parameter != null">
<include refid="Example_Where_Clause" />
</if>
<if test="orderByClause != null">
order by ${orderByClause}
</if>
</select>
<select id="selectByPrimaryKeyWithDept" parameterType="java.lang.Integer" resultMap="WithDeptResultMap">
select
<include refid="WithDept_Column_List" />
from tb_emp e left join tb_dept d on e.d_id=d.dept_id
where emp_id = #{empId,jdbcType=INTEGER}
</select>

d.测试Mapper

Spring 整合 Junit 5 测试 Mapper 添加数据

1
2
3
4
5
6
7
8
9
10
11
12
13
14
15
16
17
18
19
20
21
22
23
24
25
26
27
28
29
30
31
32
33
34
35
@SpringJUnitConfig(locations = "classpath:applicationContext.xml")
public class MapperTest {

@Autowired
DepartmentMapper departmentMapper;

@Autowired
EmployeeMapper employeeMapper;

@Autowired
SqlSession sqlSession;

@Test
public void testDept() {
//新增部门信息
departmentMapper.insertSelective(new Department(null, "简简部"));
}

@Test
public void testEmp() {
//插入一条员工数据
employeeMapper.insertSelective(new Employee(null, "张三", 1, "zhangsan@qq.com", 1));
employeeMapper.insertSelective(new Employee(null, "李四", 1, "lisi@163.com", 1));

}
@Test
public void testBatchEmp() {
//批量插入员工数据
EmployeeMapper mapper = sqlSession.getMapper(EmployeeMapper.class);
for (int i = 0; i < 100; i++) {
String uid = UUID.randomUUID().toString().substring(0, 5) + i;
mapper.insertSelective(new Employee(null, uid, 2, uid + "@gmail.com", 2));
}
}
}

3.查询数据

  • Controller 是为前端提供的访问入口,不用关心具体的业务逻辑。具体的业务逻辑放在了 ServiceImpl里,Controller 只需调用它封装好的方法即可。
  • Service 提供业务逻辑要用到的方法,ServiceImpl 提供方法的具体实现。即,ServiceImpl 负责了主要的功能编写,Controller 提供了使用的入口。
  • Mapper 为 ServiceImpl 提供操作数据的方法,但方法的具体实现(也就是SQL语句)放在了mapper下的xml文件里。

Service

1
2
3
public interface EmployeeService {
List<Employee> getAll();
}
1
2
3
4
5
6
7
8
9
10
11
@Service
public class EmployeeServiceImpl implements EmployeeService {

@Autowired
EmployeeMapper employeeMapper;

@Override
public List<Employee> getAll() {
return employeeMapper.selectByExampleWithDept(null);
}
}

Controller

1
2
3
4
5
6
7
8
9
10
11
12
13
14
15
16
17
18
19
20
21
@Controller
public class EmployeeController {

@Autowired
EmployeeService employeeService;

/**
* 分页查询所有员工
*/
@RequestMapping(value = "/employees", method = {RequestMethod.GET})
@ResponseBody
public Msg getEmpsWithJson(@RequestParam(value = "pageNum", defaultValue = "1") Integer pageNum,@RequestParam(value = "pageSize", defaultValue = "5") Integer pageSize) {
//参数pageNum是页码值 参数pageSize 代表是每页显示条数
PageHelper.startPage(pageNum, pageSize);
List<Employee> emps = employeeService.getAll();
//用PageInfo对结果进行包装 ,navigatePages 导航页号
PageInfo page = new PageInfo(emps, 4);
return Msg.success().add("pageInfo", page);
}

}

添加 Msg 类引入链式编程

1
2
3
4
5
6
7
8
9
10
11
12
13
14
15
16
17
18
19
20
21
22
23
24
25
26
27
28
29
30
31
32
33
34
35
36
37
38
39
40
41
42
43
44
45
46
47
48
49
50
51
52
53
54
55
56
package com.jianjian.crud.bean;

import java.util.HashMap;
import java.util.Map;

//通用的用来返回JSON数据的类
public class Msg {

private int code;//状态码 100成功 200失败
private String msg;//用户返回给浏览器的数据
private Map<String, Object> data = new HashMap<>();//用户返回给浏览器的数据

public static Msg success() {
Msg result = new Msg();
result.setCode(100);
result.setMsg("处理成功");
return result;
}

public static Msg fail() {
Msg result = new Msg();
result.setCode(200);
result.setMsg("处理失败");
return result;
}

//链式编程
public Msg add(String key, Object value) {
this.getData().put(key, value);
return this;
}

public int getCode() {
return code;
}

public void setCode(int code) {
this.code = code;
}

public String getMsg() {
return msg;
}

public void setMsg(String msg) {
this.msg = msg;
}

public Map<String, Object> getData() {
return data;
}

public void setData(Map<String, Object> data) {
this.data = data;
}
}

Mapper

1
2
3
public interface EmployeeMapper {
List<Employee> selectByExampleWithDept(EmployeeExample example);
}
1
2
3
4
5
6
7
8
9
10
11
12
13
14
15
16
17
18
19
20
  <!--带部门查询-->
<select id="selectByExampleWithDept" parameterType="com.jianjian.crud.bean.EmployeeExample" resultMap="WithDeptResultMap">
select
<if test="distinct">
distinct
</if>
<include refid="WithDept_Column_List" />
from tb_emp e left join tb_dept d on e.d_id=d.dept_id
<if test="_parameter != null">
<include refid="Example_Where_Clause" />
</if>
<if test="orderByClause != null">
order by ${orderByClause}
</if>
</select>

<!--带部门列的sql-->
<sql id="WithDept_Column_List">
e.emp_id, e.emp_name, e.gender, e.email, e.d_id, d.dept_id, d.dept_name
</sql>

MVCTest

1
2
3
4
5
6
7
8
9
10
11
12
13
14
15
16
17
18
19
20
21
22
23
24
25
26
@WebAppConfiguration
@SpringJUnitConfig(locations = {"classpath:applicationContext.xml", "classpath:springMVC.xml"})
public class MVCTest {

//传入MVC的IOC容器
@Autowired
WebApplicationContext context;

//虚拟MVC请求,获取处理结果
MockMvc mockMvc;

@BeforeEach
public void initMokcMvc() {
mockMvc = MockMvcBuilders.webAppContextSetup(context).build();
}

@Test
public void testPage() throws Exception {
//模拟请求拿到返回值
MvcResult result = mockMvc.perform(MockMvcRequestBuilders.get("/employees").param("pageNum", "1").param("pageSize","5")).andReturn();
MockHttpServletRequest request = result.getRequest();
System.out.println("请求"+request);

}

}

4.修改数据

  • 点击编辑按钮,弹出用户修改的对话框。
  • 对话框可以回显用户的信息,包括部门信息。
  • 点击确定,完成修改操作。

Service

1
2
3
4
5
6
7
8
public interface EmployeeService {
......

Employee getEmp(Integer empId);

void updateEmp(Employee employee);

}
1
2
3
4
5
6
7
8
9
10
11
12
13
14
15
16
17
18
@Service
public class EmployeeServiceImpl implements EmployeeService {

@Autowired
EmployeeMapper employeeMapper;

......

@Override
public Employee getEmp(Integer empId) {
return employeeMapper.selectByPrimaryKey(empId);
}

@Override
public void updateEmp(Employee employee) {
employeeMapper.updateByPrimaryKey(employee);
}
}
1
2
3
public interface DepartmentService {
List<Department> getAllDept();
}
1
2
3
4
5
6
7
8
9
@Service
public class DepartmentServiceImpl implements DepartmentService {
@Autowired
DepartmentMapper departmentMapper;
@Override
public List<Department> getAllDept() {
return departmentMapper.selectByExample(null);
}
}

Controller

1
2
3
4
5
6
7
8
9
10
11
12
13
14
15
16
17
18
19
20
21
22
23
24
25
26
27
@Controller
public class EmployeeController {
@Autowired
EmployeeService employeeService;

......

/**
* 查询指定员工
*/
@RequestMapping(value = "/emp/{empId}", method = {RequestMethod.GET})
@ResponseBody
public Msg getEmployee(@PathVariable("empId") Integer empId) {
Employee employee = employeeService.getEmp(empId);
return Msg.success().add("emp", employee);
}

/**
* 更新员工信息
*/
@RequestMapping(value = "/update", method = {RequestMethod.PUT})
@ResponseBody
public Msg updateEmployees(@RequestBody Employee employee) {
employeeService.updateEmp(employee);
return Msg.success();
}
}
1
2
3
4
5
6
7
8
9
10
11
12
13
14
15
16
@Controller
public class DepartmentController {

@Autowired
DepartmentService departmentService;

/**
*查询所有部门
*/
@RequestMapping(value ="/dept",method = {RequestMethod.GET})
@ResponseBody
public Msg getDepartments() {
List<Department> dept = departmentService.getAllDept();
return Msg.success().add("dept", dept);
}
}

Mapper

1
2
3
4
5
6
7
8
public interface EmployeeMapper {

......

Employee selectByPrimaryKey(Integer empId);

int updateByPrimaryKey(Employee row);
}
1
2
3
4
5
6
7
8
9
10
11
12
13
14
15
16
17
18
19
<select id="selectByPrimaryKey" parameterType="java.lang.Integer" resultMap="BaseResultMap">
select
<include refid="Base_Column_List" />
from tb_emp
where emp_id = #{empId,jdbcType=INTEGER}
</select>

<sql id="Base_Column_List">
emp_id, emp_name, gender, email, d_id
</sql>

<update id="updateByPrimaryKey" parameterType="com.jianjian.crud.bean.Employee">
update tb_emp
set emp_name = #{empName,jdbcType=VARCHAR},
gender = #{gender,jdbcType=INTEGER},
email = #{email,jdbcType=VARCHAR},
d_id = #{dId,jdbcType=INTEGER}
where emp_id = #{empId,jdbcType=INTEGER}
</update>
1
2
3
public interface DepartmentMapper {
List<Department> selectByExample(DepartmentExample example);
}
1
2
3
4
5
6
7
8
9
10
11
12
13
14
15
16
17
18
<select id="selectByExample" parameterType="com.jianjian.crud.bean.DepartmentExample" resultMap="BaseResultMap">
select
<if test="distinct">
distinct
</if>
<include refid="Base_Column_List" />
from tb_dept
<if test="_parameter != null">
<include refid="Example_Where_Clause" />
</if>
<if test="orderByClause != null">
order by ${orderByClause}
</if>
</select>

<sql id="Base_Column_List">
dept_id, dept_name
</sql>

5.添加数据

  • 点击“新增”弹出对话框
  • 去数据库中查询部门列表,显示在对话框内
  • 对用户输入的数据进行校验
  • 保存输入数据

Service

1
2
3
4
5
6
public interface EmployeeService {

......

void addEmp(Employee employee);
}
1
2
3
4
5
6
7
8
9
10
11
12
13
@Service
public class EmployeeServiceImpl implements EmployeeService {

@Autowired
EmployeeMapper employeeMapper;

......

@Override
public void addEmp(Employee employee) {
employeeMapper.insert(employee);
}
}

Controller

1
2
3
4
5
6
7
8
9
10
11
12
13
14
15
16
17
@Controller
public class EmployeeController {
@Autowired
EmployeeService employeeService;

......

/**
* 添加员工
*/
@RequestMapping(value = "/add", method = {RequestMethod.POST})
@ResponseBody
public Msg addEmployees(@RequestBody Employee employee) {
employeeService.addEmp(employee);
return Msg.success();
}
}

Mapper

1
2
3
4
5
6
public interface EmployeeMapper {

......

int insert(Employee row);
}
1
2
3
4
5
6
<insert id="insert" parameterType="com.jianjian.crud.bean.Employee">
insert into tb_emp (emp_id, emp_name, gender,
email, d_id)
values (#{empId,jdbcType=INTEGER}, #{empName,jdbcType=VARCHAR}, #{gender,jdbcType=INTEGER},
#{email,jdbcType=VARCHAR}, #{dId,jdbcType=INTEGER})
</insert>

6.删除数据

  • 单个删除:点击某条用户的删除按钮,弹出提示框,点击确定即可删除
  • 批量删除:选择多条用户,再点击删除按钮,弹出提示框,点击确定即可删除

Service

1
2
3
4
5
6
7
8
public interface EmployeeService {

......

void deleteEmp(Integer empId);

int deleteBatchEmp(List<Integer> empIds);
}
1
2
3
4
5
6
7
8
9
10
11
12
13
14
15
16
17
18
@Service
public class EmployeeServiceImpl implements EmployeeService {

@Autowired
EmployeeMapper employeeMapper;

......

@Override
public void deleteEmp(Integer empId) {
employeeMapper.deleteByPrimaryKey(empId);
}

@Override
public int deleteBatchEmp(List<Integer> empIds) {
return employeeMapper.deleteBatchByIds(empIds);
}
}

Controller

1
2
3
4
5
6
7
8
9
10
11
12
13
14
15
16
17
18
19
20
21
22
23
24
25
26
27
@Controller
public class EmployeeController {
@Autowired
EmployeeService employeeService;

......

/**
* 删除指定员工
*/
@RequestMapping(value = "/delete/{empId}", method = {RequestMethod.DELETE})
@ResponseBody
public Msg deleteEmployee(@PathVariable("empId") Integer empId) {
employeeService.deleteEmp(empId);
return Msg.success();
}
/**
* 批量删除员工
*/
@RequestMapping(value = "/batch_delete", method = {RequestMethod.DELETE})
@ResponseBody
public Msg deleteBatchEmployees(@RequestBody Map<String, Object> empIds) {
List<Integer> Ids = (List<Integer>) empIds.get("empIds");
employeeService.deleteBatchEmp(Ids);
return Msg.success();
}
}

Mapper

1
2
3
4
5
6
7
8
public interface EmployeeMapper {

......

int deleteByPrimaryKey(Integer empId);

int deleteBatchByIds(List<Integer> empIds);
}
1
2
3
4
5
6
7
8
9
10
11
<delete id="deleteByPrimaryKey" parameterType="java.lang.Integer">
delete from tb_emp
where emp_id = #{empId,jdbcType=INTEGER}
</delete>

<delete id="deleteBatchByIds" parameterType="java.util.List">
DELETE FROM tb_emp WHERE emp_id IN
<foreach collection="list" item="empId" open="(" close=")" separator=",">
#{empId}
</foreach>
</delete>

三、前端实现

1.项目构建

创建vue3项目

1
2
3
4
5
## 创建
vue create ssm-crud-front
## 启动
cd ssm-crud-front
npm run serve

引入相关依赖

elemen-plus

安装

1
2
3
4
5
## vue-cli安装
vue add element-plus

## npm安装
npm install element-plus --save

引入

1
2
3
4
5
6
7
8
// main.js

import ElementPlus from 'element-plus'
import 'element-plus/dist/index.css'
import zhCn from 'element-plus/lib/locale/lang/zh-cn'//设置中文

const app = createApp(App)
app.use(ElementPlus, {locale: zhCn}).mount('#app')
elemen-plus-icons

安装

1
npm install @element-plus/icons-vue -S

引入

1
2
3
4
5
6
7
8
9
// main.js

//全局导入
import * as ElementPlusIconsVue from '@element-plus/icons-vue'

const app = createApp(App)
for (const [key, component] of Object.entries(ElementPlusIconsVue)) {
app.component(key, component)
}
axios
1
2
3
npm install axios -S

import axios from 'axios' #哪里使用哪里导入
router

安装

1
2
3
4
5
## vue-cli安装
vue add router

## npm安装
npm install vue-router -S

引入

1
2
3
4
5
6
// main.js

import router from './router'

const app = createApp(App)
app.use(router)

2.项目配置

main.js

1
2
3
4
5
6
7
8
9
10
11
12
13
14
15
16
import { createApp } from 'vue'
import App from './App.vue'
import router from './router'//路由
import ElementPlus from 'element-plus'//element-plus
import 'element-plus/dist/index.css'//element-plus
import zhCn from 'element-plus/lib/locale/lang/zh-cn'//element-plus中文
import * as ElementPlusIconsVue from '@element-plus/icons-vue'//element-plus-icons

const app = createApp(App)

//配置全局icon
for (const [key, component] of Object.entries(ElementPlusIconsVue)) {
app.component(key, component)
}

app.use(router).use(ElementPlus, {locale: zhCn}).mount('#app')

vue.config.js

1
2
3
4
5
6
7
8
9
10
11
12
13
14
15
16
17
18
19
20
21
//解决跨域问题
const { defineConfig } = require('@vue/cli-service')
module.exports = defineConfig({
transpileDependencies: true,
devServer: {
open: true, // npm run serve后自动打开页面
host: '0.0.0.0', // 匹配本机IP地址(默认是0.0.0.0)
port: 8084, // 开发服务器运行端口号
proxy: {// 解决跨域问题
'/api': {
target: 'http://localhost:8080/', //后端接口域名
changeOrigin: true, //是否跨域
ws: true, //是否代理 websockets
secure: false, //是否https接口
pathRewrite: { //路径重置
'^/api': ''
}
}
},
},
})

router/index.js

1
2
3
4
5
6
7
8
9
10
11
12
13
14
15
16
17
18
19
20
21
22
import { createRouter, createWebHashHistory } from 'vue-router'
import CrudView from '../views/CrudView.vue'
const routes = [
{
path: '/',
name: 'home',
component: CrudView
},
{
path: '/about',
name: 'about',
// 懒加载
component: () => import(/* webpackChunkName: "about" */ '../views/AboutView.vue')
}
]

const router = createRouter({
history: createWebHashHistory(),
routes
})

export default router

3.页面构建

组件(components)

1
2
3
4
5
6
7
8
9
10
11
12
13
14
15
16
17
18
19
20
21
22
23
24
25
26
27
28
29
30
31
32
33
34
35
36
37
38
39
40
41
42
43
44
45
46
47
48
49
50
51
52
53
54
<template>
<el-header class="header">
<a href="/" class="nav-link">
<img class="nav-logo" src="../assets/favicon.png" alt="logo"/>
<h2 class="nav-title">SSM-VUE-CRUD</h2>
</a>
<el-button type="default" size="default" :plain="true" @click="skipAbout()">关于</el-button>
</el-header>
</template>

<script setup>
import { useRouter } from "vue-router";
import { ElMessage} from "element-plus";


//关于页跳转
const router = useRouter();
const skipAbout = () => {
// window.location.href='#/about';
// router.push({path:'about'})
router.push({ name: "about" }); //路由名
//弹框提示
ElMessage({
showClose: true,
message: "这是本项目的关于页面!",
center: true,
type: "success",
});
};
</script>

<style scoped>
.header {
display: flex;
align-items: center;
justify-content: space-between;
width: 100%;
border-bottom: 1px solid #eee;
min-width: 800px;
}
.nav-logo {
height: 45px;
width: 45px;
vertical-align: middle;
display: inline-block;
}
.nav-title {
/* font-size: 2rem; */
display: inline-block;
vertical-align: middle;
color: #79bbff;
padding-top: 10px;
}
</style>
1
2
3
4
5
6
7
8
9
10
11
12
13
14
15
16
17
18
19
20
<template>
<el-footer class="footer">
<span>SSM-VUE-CRUD ©2022 Created by </span>
<a href="https://jwt1399.top" style="text-decoration: none;color: #409eff;"> jwt1399.top</a>
</el-footer>
</template>

<style scoped>
.footer {
/* 显示在底部*/
position: relative;
text-align: center;
width: 100%;
/* 垂直居中*/
height: 60px;
line-height:60px;
background-color: #fff;
border-top:1px solid #E7E7E7;
}
</style>

页面(views)

App
1
2
3
4
5
6
7
8
9
10
11
12
13
14
15
16
17
18
19
20
21
22
23
24
25
26
27
28
29
30
31
<template>
<Header/>
<router-view/>
<Footer/>
</template>

<script setup>
import Header from '@/components/Header.vue'
import Footer from '@/components/Footer.vue'
</script>

<style>
#app {
font-family: Avenir, Helvetica, Arial, sans-serif;
-webkit-font-smoothing: antialiased;
-moz-osx-font-smoothing: grayscale;
}
</style>


<!-- 不使用script setup语法糖 -->
<!-- <script>
import Header from '@/components/Header.vue'
import Footer from '@/components/Footer.vue'
export default {
components: {
Header,
Footer,
}
}
</script> -->
AboutView
1
2
3
4
5
6
7
8
9
10
11
12
13
14
15
16
17
18
19
20
21
22
23
<template>
<div class="about">
<h2>基于SSM-VUE前后端分离的 CRUD 系统</h2>
<h3>前端</h3>
<p>开发框架:Vue3、Axios、Element Plus</p>
<p>脚手架:@Vue/cli</p>
<p>包管理: npm</p>
<p>开发工具:VSCode、Chrome</p>
<h3>后端</h3>
<p>开发框架:Spring、SpringMVC、Mybatis</p>
<p>数据库:MySQL</p>
<p>分页: pagehelper</p>
<p>逆向工程: Mybatis Generator</p>
<p>依赖管理: Maven</p>
<p>开发工具:IDEA 2022.1、Navicat 16</p>
</div>
</template>

<style scoped>
.about{
text-align: center;
}
</style>
CrudView
1
2
3
4
5
6
7
8
9
10
11
12
13
14
15
16
17
18
19
20
21
22
23
24
25
26
27
28
29
30
31
32
33
34
35
36
37
38
39
40
41
42
43
44
45
46
47
48
49
50
51
52
53
54
55
56
57
58
59
60
61
62
63
64
65
66
67
68
69
70
71
72
73
74
75
76
77
78
79
80
81
82
83
84
85
86
87
88
89
90
91
92
93
94
95
96
97
98
99
100
101
102
103
104
105
106
107
108
109
110
111
112
113
114
115
116
117
118
119
120
121
122
123
124
125
126
127
128
129
130
131
132
133
134
135
136
137
138
139
140
141
142
143
144
145
146
147
148
149
150
151
152
153
154
155
156
157
158
159
160
161
162
163
164
165
166
167
168
169
170
171
172
173
174
175
176
177
178
179
180
181
182
183
184
185
186
187
188
189
190
191
192
193
194
195
196
197
198
199
200
201
202
203
204
205
206
207
208
209
210
211
212
213
214
215
216
217
218
219
220
221
222
223
224
225
226
227
228
229
230
231
232
233
234
235
236
237
238
239
240
241
242
243
244
245
246
247
248
249
250
251
252
253
254
255
256
257
258
259
260
261
262
263
264
265
266
267
268
269
270
271
272
273
274
275
276
277
278
279
280
281
282
283
284
285
286
287
288
289
290
291
292
293
294
295
296
297
298
299
300
301
302
303
304
305
306
307
308
309
310
311
312
313
314
315
316
317
318
319
320
321
322
323
324
325
326
327
328
329
330
331
332
333
334
335
336
337
338
339
340
341
342
343
344
345
346
347
348
349
350
351
352
353
354
355
356
357
358
359
360
361
362
363
364
365
366
367
368
369
370
371
372
373
374
375
376
377
378
379
380
381
382
383
384
385
386
387
388
389
390
391
392
393
394
395
396
397
398
399
400
401
402
403
404
405
406
407
408
<template>
<el-main>
<!--员工列表-->
<div class="data-table">
<el-table
:data="employeeList"
border
style="width: 100%"
v-loading="loading"
@selection-change="handleSelectionChange"
>
<el-table-column type="selection"></el-table-column>
<el-table-column prop="empId" label="id" sortable></el-table-column>
<el-table-column prop="empName" label="姓名"></el-table-column>
<el-table-column prop="gender" label="性别" :formatter="formatterSex"></el-table-column>
<el-table-column prop="email" label="邮箱"></el-table-column>
<el-table-column prop="department.deptName" label="部门"></el-table-column>
<!-- <el-table-column label="操作"> -->
<el-table-column align="center">
<template #header>
<el-button type="primary" size="default" @click="handleAdd()">添加</el-button>
<el-button type="danger" size="default" @click="handleBatchDelete()">删除</el-button>
</template>
<template #default="scope">
<el-button
type="primary"
size="large"
:icon="Edit"
@click="handleEdit(scope.$index, scope.row)"
circle
>
</el-button>
<el-button
type="danger"
size="large"
:icon="Delete"
@click="handleDelete(scope.$index, scope.row)"
circle
>
</el-button>
</template>
</el-table-column>
</el-table>

</div>
<!--分页-->
<div class="table-pagination">
<el-pagination
v-model:current-page="pageNum"
v-model:page-size="pageSize"
:page-sizes="[5, 10, 15, 20]"
:small="small"
:disabled="disabled"
:background="background"
layout="total, sizes, prev, pager, next, jumper"
:total="total"
@size-change="handleSizeChange"
@current-change="handleCurrentChange"
>
</el-pagination>
</div>
</el-main>

<!--修改/添加表单-->
<el-dialog
v-model="dialogFormVisible"
:title="editNameDisabled ? '修改' : '添加'"
@close="dialogClose">
<el-form
:model="EmpForm"
:rules="rules"
ref="formRef"
label-position="right"
label-width="80px"
status-icon>
<el-form-item label="姓名" prop="empName">
<el-input v-model="EmpForm.empName" :disabled="editNameDisabled"></el-input>
</el-form-item>
<el-form-item label="邮箱" prop="email">
<el-input v-model="EmpForm.email"></el-input>
</el-form-item>
<el-form-item label="性别" prop="gender">
<el-radio-group v-model="EmpForm.gender">
<el-radio :label="1" border size="default"></el-radio>
<el-radio :label="2" border size="default"></el-radio>
</el-radio-group>
</el-form-item>
<el-form-item label="所属部门" prop="dId">
<el-select v-model="EmpForm.dId" placeholder="请选择部门">
<el-option v-for="(item,index) in DeptList" :key="index" :label="item.deptName" :value="item.deptId">
</el-option>
</el-select>
</el-form-item>
</el-form>
<template #footer>
<span class="dialog-footer">
<el-button @click="resetForm">取消</el-button>
<el-button @click="SubmitForm" type="primary" >确定</el-button>
</span>
</template>
</el-dialog>
</template>

<script setup>
import { ElMessage, ElMessageBox } from "element-plus";
import { ref, reactive } from "vue";
import { Search, Edit, Delete } from "@element-plus/icons-vue";
import axios from "axios";

/**
* 分页相关
*/
const pageNum = ref(1);
const pageSize = ref(10);
const small = ref(false);
const background = ref(true);
const disabled = ref(false);
const total = ref(null);
const handleSizeChange = (val) => {//每页条目数
console.log(`每页条目数:${val}`);
getEmployeeList(pageNum.value, val);
};
const handleCurrentChange = (val) => {//当前页面
console.log(`当前页面: ${val}`);
getEmployeeList(val, pageSize.value);
};

/**
* 员工增删改
*/
// 新增按钮
const handleAdd = () => {
// getAllDept();
editNameDisabled.value = false;
dialogFormVisible.value = true;
};
//勾选框改变
let batchIds = [];
const handleSelectionChange = (val) => {
console.log("勾选的信息:",val);
var arrs = [];
for (var i = 0; i < val.length; i++) {
arrs.push(val[i].empId);
}
batchIds = arrs;
};
// 批量删除按钮
const handleBatchDelete = () => {
ElMessageBox.confirm("此操作将永久删除这些信息, 是否继续?", "提示", {
confirmButtonText: "确定",
cancelButtonText: "取消",
type: "warning",
})
.then(() => {
batchDeleteEmp(batchIds);
})
.catch(() => {
ElMessage({
type: "info",
message: "删除取消",
});
});
};
// 删除按钮
const handleDelete = (index, row) => {
console.log(index, row);
ElMessageBox.confirm("此操作将永久删除该信息, 是否继续?", "提示", {
confirmButtonText: "确定",
cancelButtonText: "取消",
type: "warning",
})
.then(() => {
deleteEmployee(row.empId);
})
.catch(() => {
ElMessage({ type: "info", message: "删除取消" });
});
};
// 修改按钮
const handleEdit = (index, row) => {
console.log(index, row);
getEmployee(row.empId);
// getAllDept();
editNameDisabled.value = true;
dialogFormVisible.value = true;

};

/**
* axios请求
*/
// 查询单个员工信息
const EmpForm = ref({});//存储单个员工信息
function getEmployee(empId) {
axios
.get(`api/ssm_crud_back/emp/${empId}`)
.then((response) => {
console.log("单个员工信息:",response.data);
EmpForm.value = response.data.data.emp;
console.log(EmpForm);
})
.catch((error) => {
console.log(error);
});
}
//获取所有员工数据
const employeeList = ref([]); //员工列表
const loading = ref(true); //加载动画
function getEmployeeList(pageNum, pageSize) {
axios.get("api/ssm_crud_back/employees/", {
params: {
pageNum: pageNum,
pageSize: pageSize,
},
})
.then(function (res) {
console.log("所有员工信息:" , res.data);
loading.value = false;
employeeList.value = res.data.data.pageInfo.list;
total.value = res.data.data.pageInfo.total;
pageSize = res.data.data.pageInfo.pageSize;
pageNum = res.data.data.pageInfo.pageNum;
})
.catch(function (error) {
console.log(error);
});
}
//性别格式化
const formatterSex = (row, column) => {
return row.gender == 1 ? "男" : "女";
};
//删除员工信息
function deleteEmployee(empId) {
axios.delete(`api/ssm_crud_back/delete/${empId}`)
.then(res => {
if (res.data.code == 100) {
getEmployeeList(pageNum.value,pageSize.value);
ElMessage({ type: "success", message: "删除成功" });
} else {
ElMessage({ type: "error", message: "删除失败" });
}
})
.catch(error => {
console.log(error);
});
}
// 更新员工信息
function updateEmployee(params) {
axios.put("api/ssm_crud_back/update", {...params})
.then(res => {
console.log(res.data)
if (res.data.code == 100) {
ElMessage({ type: "success", message: "更新成功" });
getEmployeeList(pageNum.value,pageSize.value);
} else {
ElMessage({ type: "error", message: "更新失败" });
}
})
.catch(error => {
console.log(error);
});
}
//获取所有部门
let DeptList = ref({})//存储部门信息
function getAllDept() {
axios.get("api/ssm_crud_back/dept")
.then(res => {
console.log("部门信息:",res.data);
DeptList.value = res.data.data.dept;
})
.catch(error => {
console.log(error);
});
}
//批量删除
function batchDeleteEmp(empIds){
if (empIds.length == 0) {
ElMessage({
message: "最少选择一位员工!",
type: "warning",
});
return;
}
axios.delete("api/ssm_crud_back/batch_delete/", {data: {empIds: empIds}})
.then(res => {
ElMessage({
type: "success",
message: "删除成功",
});
getEmployeeList(pageNum.value,pageSize.value);
})
.catch(error => {
ElMessage({
type: "error",
message: "删除失败",
});
});
}
//添加员工信息
function addEmployee(params) {
axios.post("api/ssm_crud_back/add", {...params})
.then(res => {
console.log("添加",res.data)
if (res.data.code == 100) {
ElMessage({ type: "success", message: "添加成功" });
getEmployeeList(pageNum.value,pageSize.value);
return;
}
ElMessage({ type: "error", message: "添加失败" });
})
.catch(error => {
console.log(error);
})
}

/**
* setup阶段执行函数
*/
//调用获取所有部门
getAllDept()
//调用获取所有员工
getEmployeeList(pageNum.value,pageSize.value);

/**
* 修改/添加对话框相关
*/
//显示/隐藏对话框
let dialogFormVisible = ref(false);
//名字是否可编辑
let editNameDisabled = ref(false);
//获取表单dom元素
let formRef = ref(null);
//对话框取消按钮
function resetForm() {
formRef.value.resetFields();
dialogFormVisible.value = false;
}
//对话框关闭
function dialogClose() {
formRef.value.resetFields();
}
//对话框确定按钮
function SubmitForm() {
formRef.value.validate((valid) => {//表单验证
if (valid) {
if (editNameDisabled.value) {
updateEmployee(EmpForm.value);
} else {
addEmployee(EmpForm.value);
}
dialogFormVisible.value = false;
}
})
}
//对话框表单验证
const rules = reactive({
empName: [
{
required: true,
message: "请输入姓名",
trigger: "blur",
},
{
min: 1,
max: 15,
message: "长度应该1 ~ 15",
trigger: "blur",
},
],
email: [
{
required: true,
message: "请输入正确邮箱",
trigger: "blur",
pattern: /^[A-Za-z0-9\u4e00-\u9fa5]+@[a-zA-Z0-9_-]+(\.[a-zA-Z0-9_-]+)+$/,
},
],
gender: [
{
required: true,
message: "请选择性别",
trigger: "blur",
},
],
dId: [
{
required: true,
message: "请选择部门",
trigger: "blur",
},
],
department: [
{
required: true,
message: "请选择部门",
trigger: "blur",
},
],
});
</script>

<style scoped>
.table-pagination {
display: flex;
justify-content: center;
padding: 20px;
}
</style>

参考